Stuka Stunt Control Line Forum
Archive, 2000–2021 · recovered from the Internet Archive
Forums › Stuka Stunt Main Forum

tools and such

Stuka Stunt Main Forum · 29 of 29 known posts recovered

mccoy40 · Aug 15, 2002 07:57 AM

#0 source
This is a topic that I thought I would start and hopefully everyone could contribute a little piece of info too. I make little tools that I use around the shop to help with various building items.
I have a commercial balsa stripper that is just great for getting good cap strips, etc. Unfortunately the widest I can set the blade is 3/4" of an inch. A lot of the trailing edges I see on plans are one inch wide so I need a special tool to make these strips. I glued two chunks of 1/2 inch wood together added a 1/16 inch plate to the edge of that and a single edge razor blade to the other. The razor blade was held on with two screws. It worked great and has cut some 8 or 9 t.e. strips perfectly. It just bit the dust because the 1/16 inch plate split. Next one I'll use plwood or popsicle stick or just 1/8 inch balsa. It took about 3 minutes to make, most of which was spent looking for good square wood.
Tell me about your tools.

gcb · Aug 15, 2002 08:49 AM

#1 source
To make TE's, I use a 1/2 inch plywood cutting surface (sanded smooth) as a base. I place a 1/8"x1"x48" piece of aluminum (from Home Depot., etc.) over the balsa and secure it with spring clamps (so it won't move while I'm cutting). Cuts are made with a trusty (not rusty) #11 blade in an X-Acto #1 handle.
I cut oversize because some balsa tends to flex after being cut into strips. The second cut is for the correct dimensions.
For cap strips I still use my X-Acto balsa stripper.

Hey...whatever works

George

Jim T. · Aug 15, 2002 09:58 AM

#2 source
I use an aluminum yardstick stuck to the balsa with double-stick tape. A thicker piece of aluminum would probably be better--help keep the #11 blade square.

For rib notches I make a tool that is T-shaped in cross section, with the leg of the T the spar thickness, and spar depth with sandpaper glued on the foot of the leg.

Jim Thomerson

mccoy40 · Aug 15, 2002 10:03 AM

#3 source
Jim,
I use that sanding T too - I start my slots at first thought with a saw then sand them clean.
Any ideas on how to cut the leading edge triangle(ala sig banshee) into ribs?

Bob Reeves · Aug 15, 2002 10:21 AM

#4 source
This may be off topic a little but if you haven't discovered how useful an inexpensive router and router table are you are sure doing some operations the hard way. I use mine for all kinds of stuff like...

Rounding the edges of profile fuselages..
Rounding the leading edges of flaps and elevators.
Cutting the notches to inset the hinge barrel.
Rounding 1/2" x 1/2" leading edges

Accurate and sure saves allot of planning and sanding

TigreST · Aug 16, 2002 12:05 AM

RE: tools and such (pictures)#5 source
Mr. "Dammit Jim I'm just a doctor!" McCoy,

Home made shop tools in my hangar include the following items.

Sanding blocks: These are made from oak. They start out life as the “shorts” that are cut off at the local lumber yard/diy outlet. They’re finished (trued) on all sides and are very hard. I cut them to size as need (or as shown) then bevel two of the adjacent edges so that I can see the edge I’m working on if it’s in a tight corner, and leave two edges at true 90’s for truing up work. The black material is the “hook” half of a “hook and loop” system for attaching the sandpaper. I found this at a local tool outlet in a sheet 2ft x 3ft. It’s peel and stick and the skies the limit for what you can apply it to. The sandpaper is sourced from the same tool shop, and goes for approx. $.55 a half sheet (that’s Canadian funds) and may seem a little rich at first. But once you try this stuff you may never go back to the old stuff, ..it wears like iron. I made numerous sets of these blocks up for fellow club members and most like their performance. Many comment on how long the paper lasts. The paper comes out of Sweden under the brand name of Blue-Line Siafast. Grits run from 60 right up to 600 and beyond (I think).

[photo not recovered: 3d5c80d069b83f53.jpg]


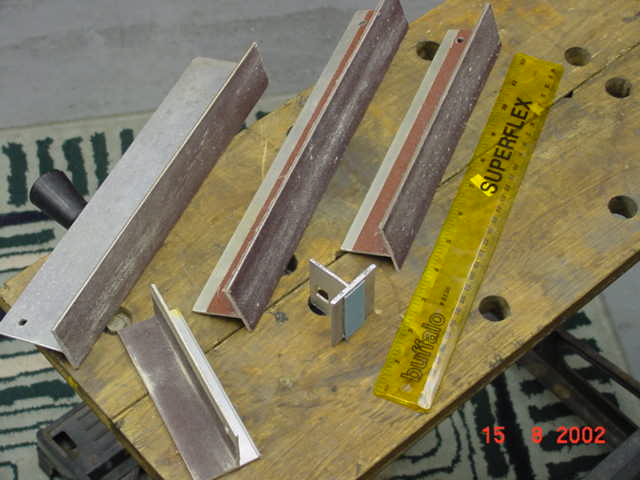
Sanding bars: These are made from industrial instrument wiring tray alum I-beam material that has been ripped in half. The paper is sourced from the machine shop emery paper suppliers and comes in rolls approx 2 inches wide. Contact cement holds the paper on the bars, and again, in wood service, wears very well. The smallest one is used for sanding barrel slots into flying surfaces for hinge installs. This one is using the hook&loop material to hold the Blue-Line paper on. A couple of the bars have paper double edged so as to be able to sand tapers into surface edges.
[photo not recovered: 3d5c863a6e471f23.jpg]

[photo not recovered: 3d5c85ab6ded7af9.jpg]

Drill guide: This last one is one of the most simple, but yields great results for one of those pain in the butt jobs. Namely drilling a straight/square (90 degree) hole in a hard to reach place. Once in a while you build something knowing full well you’ll need to drill a hole in the piece. Sometimes you forget the hole during the layout phase, but find out to late that it’s not there. Usually it’s to late to get the piece under the drill press to get a nice true, square to the structure, hole drilled. So you free hand it, and take your chances. Well what I’ve started doing in these cases is making a little drill guide from the scrap oak left over from the sanding blocks. I find a scrap piece of oak (which is thick enough to provide for a good guiding action), and drill a guide hole through it on the drill press (which produces a "true" hole), of the required size hole. This hole can be located anywhere, but should be in such a place as to give you best advantage when lined up on the models surface. I find that something close to an edge on one end of the guide piece works the best. With the required guide hole drilled to size and location on the “guide”, I then earmark the target location on the model, and using a punch, dimple this location. With a drill bit of required size I then slide it through the guide (while not chucked into a drill), ..Locate the “dimple”, and center the bit on the dimple. I then slide the guide down the drill bit and clamp the guide it to the surface over the target dimple. With the guide aligned and clamped I can then follow up with the 3/8th’s electric, or Dremel power tools to blow the hole through the piece with the drill bit of the required size. The picture shows a multi hole guide clamped to another piece of scrap oak. This technique is great for engine mounts and tank mount locations on profile fuselages in particular. It also works well for getting the nylon control horn mounting holes drilled true on thick stock, ..You only need worry about marking the holes on one side of the surface in most cases. For drilling balsa holes I us a pin-vise for the small sizes, ..The guide holds the pin-vise true for the “whole” job.

[photo not recovered: 3d5c81e06a872715.jpg]

HTH,
Tony

pnevai · Aug 16, 2002 02:04 AM

#6 source
I just this evening made one of my favorite tools.

Go to radio shack and get one of those cheap radio replacement antennas. Cit uff the base with a tubing cutter and seperate all of the segments. What you have are a complete set of hole saws. These antenna's being thin walled compared to standard tubing makes it easy to get almost a razor edge when carefullu sharpened on the ends. Plus you get every size you will ever likly need in one shot.

The problem is that these also come in handy when you need a stiffer yet thin walled tube for something so you end up using your tool up and have to go out to get replacements.

Larry Cunningham · Aug 16, 2002 04:02 AM

#7 source
Here's a simple "tool" - newspaper!

I saw this on a Windy tape and couldn't believe how beautifully it works.

If you've tried to cut fiberglass cloth with scissors, you know it can be a tedious pain. And if you tried to use a sharp Exacto or razor blade, you REALLY had a pain, with the cloth all grabbing and bunching up on the blade.

Yet, if you lay down several layers of newspaper under the fiberglass cloth, you'll find that a sharp razor blade will instantly cut it all day long! Nothing to it! It allows you to penetrate the cloth and press down easily.

And, another simple "tool" from a Windy tape - (Walt Prey's) idea of using aluminum foil for paint masking (INSTEAD of newspaper). The foil is relatively inexpensive, definitely blocks paint, conforms to various surfaces, and can be used to "take an impression" of your paint area by rubbing it over the 1/8" edge taping. Then you can easily trim it with a razor blade to cut out complex shapes.

Saran Wrap. Use it under sheets of balsa when you are splicing and gluing the edges with (thin) CA. It doesn't stick (usually) and saves you from gluing everything to the building surface..

Here's one my wife gave me - a painting knife. These are available in several blade shapes with quality metal blades and wooden handles, for under $10. Or in plastic for a couple of bucks. They make great spreaders for applying glue and Epoxolite/Aeropoxy, with the rounded tip used to shape a fillet. (Much better than a screwdriver or finger..) The metal bladed ones last forever, you can easily clean them with a razor blade.

L.

Charlie Stone · Aug 16, 2002 06:35 AM

#8 source
Way back in the dreamtime when I first started aeromodelling, I bought a set of X-acto balsa gouges for hollowing blocks. They were formed from strip steel into a range of interesting shapes, were sharpened, knife like on one side and fitted into the round hole in my large X-acto handle. I did not use them a lot at the time, and when next I considered using them they were missing. (They were here twenty years ago, where could they have got to?) So seeing a similar set in a local hobby shop I bought them to expand my block hollowing capabilities. It was only when I finally tried using them, I realised just how useless they are for their job of hollowing block balsa. They were awkward to use, blunt, and virtually unsharpenable, leaving a finish as though the wood had been chewed by a rat. In fact a careless rat with blunt teeth.

Feeling rather let down by this, I put my mind to the problem of hacking the surplus wood from the inside of a cowling and came up with a solution. Still using the same principle of a shaped blade in the knife handle, I made my own blades from that very useful stuff, K&S brass tubing. The tubing can be sharpened easily by running a number 11 scalpel blade around the inside. By sharpening the cutters on the inside (Opposite to the commercial design) and soldering them to another 3/16" diameter tube that fits into the handle, I ended up with cutters that really do work and can be re-sharpened easily.

Charlie


Preston Briggs · Aug 16, 2002 11:32 AM

#9 source
Hi Charlie,

>Way back in the dreamtime when
>I first started aeromodelling, I
>bought a set of X-acto
>balsa gouges for hollowing blocks.
> They were formed from
>strip steel into a range
>of interesting shapes, were sharpened,
>knife like on one side
>and fitted into the round
>hole in my large X-acto
>handle.

A similar thing is used to cut linoleum
for block printing. Speedball makes 'em
in the US. Can find them in art supply stores.

Or use your solution

Preston

Allan Perret · Aug 20, 2002 12:35 PM

#10 source
Has anybody come up with a tool to cut larger holes (5/8 to 1") in sheet balsa; like you need to make lightening holes in ribs.

Al Knight · Aug 20, 2002 01:13 PM

#11 source
Boy, those photos are great!

ST - I made that angle aluminum control surface sander and I found that I get a sharper edge on the wood by putting two pieces of adhesive sandpaper(actually, I split one piece into two) rather than trying to fold the paper into the right angle. The fold seems to be kinda rounded nomatter how carefully I stuff it into the aluminum. Two pieces gives me a really sharp angle.

Al

Ty M> · Aug 20, 2002 01:30 PM

#12 source
Many times I need a small clamp to get into tight spaces, so I bought a bag of spring loaded clothes pins. By cutting out the insides of the two nose sides, I open up the size needed for pinning two or three pieces of balsa together as the glue sets. These are cheap, quick, light and do not apply so much pressure that they crush the wood. Small "C" clamps, etc, tend to be heavy and awkward at times.
I realize this is a forum for how we make our own tools, but a look at the catalog of Tom Morris will show you many simple tools already available. I highly recommend getting the steel weights he has.
Another tool for cutting notches for ribs, stringers, etc, is by taking two or three hack saw blades about 3 inches long, glued together the width of the notch. Glue these inside a lamination of 1/16 ply.

crash · Aug 20, 2002 01:49 PM

#13 source
Allen, I use a paddle drill for cutting holes in thin balsa sheets. Works perfectly for lightening holes. The outside spike does the work while the center one keeps the work in place. Not good for thicker than 1/16" sheets though.

Broken Wings · Aug 20, 2002 02:21 PM

#14 source
I've got a Southbend 9" lathe with thread cutting gearbox and power feed, an old Southbend drill press, a Miller Syncrowave 350 heliarc welding machine, two old modelers table saws, an old Rockwell variable speed scroll saw, and a bunch of hand/power tools, and a 350lb. anvil. You'd think that I could build light (smiles) It just doesn't happen...... I keep trying though

John

TigreST · Aug 20, 2002 08:58 PM

#15 source
>Boy, those photos are great!
>
>ST - I made that angle
>aluminum control surface sander and
>I found that I get
>a sharper edge on the
>wood by putting two pieces
>of adhesive sandpaper(actually, I split
>one piece into two) rather
>than trying to fold the
>paper into the right angle.
>The fold seems to be
>kinda rounded nomatter how carefully
>I stuff it into the
>aluminum. Two pieces gives me
>a really sharp angle.
>
>Al


Al,
Actually that's just what I did too. I agree 110% much shaper edge. That emery cloth stuff it don't like to bend into a 90 degree corner so well, so your way is the fix for it.

Tony

tools · Aug 20, 2002 09:53 PM

#16 source
They work great for more than 1/16 if you go to work on them with a grinder. Make the spurs longer. These things are CHEAP, so experiment a little. They're also available for pennies at garage sales and flea markets. I've made LOTS of custom thingamabobs out of these things by grinding them all sorts of shapes.

Grind one perfectly flat on the bottom and use it to clean out the bottom of a hole started by a unmodified bit. And on and on and on...

Tools

Hib · Aug 22, 2002 11:06 AM

#17 source
LAST EDITED ON Aug-22-02 AT 02:12 PM (CDT)

Ahhhh!...Toys!!...errr TOOLS!!,

I have been reworking the fuse aft section on an RSM Nobler that sat way too long waiting for mating to the wing. In as much as it ended up with a definate "S" in plan view and a twist my decission was to "back half" it from the #2 former aft.

The problem became how to get the fuse level (straight in elevation view) again with the gear sticking down and the razor back formers sticking up. A straight edge won't quite get it.

So...here's the Zoot part! I recently got hold of a factory reconditioned "Dewalt rotary laser beacon level" ($169.00!!!) to use on my large steel sculpture projects. Figured out to clamp the bird in a vise by the LG struct wire, set the laser up 8' from the wing tip, and shoot a level line on the fuse....tweeked the fuse top level with some shim, and dropped the laser down to the wing tip...dead on incidence!!!

Next is to re-line the fuse side for stab incidence index. No problem with the bottom fuse edge now correct.

Too easy!...I figure the beacon will become a real important tool for alignment checks during building.

Not cheap, but 3 years ago these puppys were still in the $2500-$3000 range.

Any tool that you could use to hang a ceiling in a Super Wal-Mart should have a truely practical use in modeling!!!! It's just a question of scale!!

Now...if I could only get my hands on some inexpensive Nitro Methane Refining Gear...and talk the "She-E-O" into growing castor beans in the garden.......are they from "a tree or a shrub or a bush" ?? (a Lady Byrd Johnson quote)

Nitro Fumes!!! and Laser Beams!!!!!......Hib

Ed Culver · Aug 22, 2002 01:05 PM

#18 source
Hey Ty!

I take that one step further and when I need deep reaching, but not too tight clamps I glue two pices of spruce to the outside of the clothes pins. I use spruce that is long enough that the clothes pin doesn't get on whatever else there is around.

Another tool that I find incredibly useful is s bent round jeweler's file. It started one day when I needed to round the radius where my control horn went into the balsa on my flaps. I had a round jeweler's file with the tip broken off (I never throw away stuff). To bend the file you have to heat it with a torch then put in as much turn as you need. I have one that is bent about 60 degree and another that is nearly 135 degrees. I have found a jillion uses for both the inside and the outside turns of these curved files.

Later - Ed

Ty M. · Aug 22, 2002 03:31 PM

#19 source
I just came from the garage and found a tool I made last month that has saved me a bunch of grief. I took a 13/32" inside diameter 12" round brass tube by K&S, cut it to 6", cut it in half length wise and glued 180 grit sand paper in the groove. This I use to round off the leading and trailing edges of my stabs. Nice and even and round. No dips, angles or gouges. I got this idea from Jerry Day in Seattle area when I visited his shop. Now his was made from chrome moly tube and has a handle gas welded on it. He is a machinist, I am an desperate modeler!!!

Al Knight · Aug 23, 2002 09:25 AM

RE: Clothespins!#20 source
Maybe this is something everyone does already: I learned very early on from my dad that clothespins - taken apart and reversed on the spring so that the flat back end becomes the clamping surface- work great holding laminations, lap joints on sticks and stuff. Dozens of them helped me plank my Sukhoi. You have to flip the two pieces over, and the spring rests nicely in the small notch that used to retain the 90deg bend in the spring wire. That part then rests in the large half-round gully that formed the rope clamping part of the pin. (Does that make sense?) BTW- has to be the old-fashioned wooden ones.

A bag of 100 is about two bucks at the A&P.

Al

beemerbob · Aug 23, 2002 01:49 PM

#21 source
Building Surface:

How about a 24 X 36 inch hunk of 3/4 ply on top of a home-built TV tray?

I even have a couple of 3/4 inch holes drilled in the plywood to mount my Record Quick-Vise if I need to.

I use two pieced of Schd 40 plastic pipe - the inner piece is 3/4 inch and the outer is 1 inch. You do have to sand, scrape, or whatever the outside of the 3/4 inch pipe to get a sliding fit.

I fit a tapered wooden plug in one end of the smaller pipe - notched at one end for 1/4 inch ply. The 1/4 inch ply gets fastened to the nose of a model and the whole mess is mounted in the vise. Viola! A 'third hand" for finishing sanding, whatever.

beemerbob · Aug 23, 2002 04:04 PM

#22 source
I was having a bunch of trouble putting wing tips on Flight Streaks. The last one I built, I started doing the installation the old way when I remembered I used to have a 'gangly' looking tool that had adjustable arms I used in electronics repair. MicroMark calls it the "Four-Armed Holding Jig". I call it a lifesaver.

<http://www.dxmarket.com/micromark/products/60682.html>

Bob from Shalimar, Florida

Will · Aug 23, 2002 05:28 PM

#23 source
Here's a quick and cheap wing jig made from a 2x3" and piano wire. Get one that's fairly straight and long enough for the widest wingspan you'll ever need. Hinge it in the middle for swept back wings. A peice of 5/32" or 3/16" will do nicely. Cut the wire in half for 2 peices.
Drill a hole at both ends to accept the piano wire.
Lay down the leading edge between the "goalposts" and tape it down to the jig.
Loop a peice of string around the piano wire and take some trash bag tie wraps and make a series of smaller loops.

[photo not recovered: 3d66b2c85dd221dd.jpg]

[photo not recovered: 3d66b44b5f425c5c.jpg]

The smaller loops will support the ribs in a perfectly straight line parallel to the leading edge.
Insert the ribs on your premarked leading edge, square them up and use ca glue or whatever to glue in place, glue trailing edge/edges and spars on and presto! Instant wing, well almost. Wing can be taken off the jig to do the rest. The hard part is done.
Will

Dr Spark · Aug 23, 2002 06:05 PM

#24 source
Stripping balsa sheets, like 1/16" is a pain.
My worst results have been using a table saw. That's because the heat of the sawing warps the wood.

So my best results have been with a steel straightedge and a single-edge razor blade. One can estimate strip widths very accurately by eye. Cutting with a razor blade doesn't cause heat to warp the wood.

mccoy40 · Aug 29, 2002 10:52 AM

#25 source
Here is another little tool I use in my shop.
I double glue alot of joints with thinned elmers so I don't waste alot of elmers and don't over glue. This is not my idea. My idea is to use a cheap paint brush from the drug store and a soda bottle cap. I mix the glue up in the soda bottle cap then paint the joints with the elmers glue. When I'm done I just rinse everything out and put it back til next time.

mccoy40 · Aug 29, 2002 10:58 AM

#26 source
When I want to make a series of ribs for a plane like the banshee I glue the sheets together and trace the rib pattern out on the tob sheet. I then use my jigsaw to roughly cut the ribs out and then use my table sander to finish sand the ribs. You have to spend some time assuring that everything is perpendicular but once that is done the tools stay in place forever. I actually cut about 6 or 7 series of ribs out using a full 3 by 36 inch balsa block of planks.

pnevai · Aug 29, 2002 02:29 PM

#27 source
Need to put weight on something to hold it in position, or to apply pressure. But do not want to crush the balsa or need even gnetly but firm pressure?

Go to your local dive shop and buy some soft lead weight pouches. These are mylon mesh bags filled with lead shot. They are soft and will mold themselves around different shapes and contain no sharp angles or hard surfaces to dent or mar a surface. The come in 2,4,6,8 lb sizes. I use my four, 4lbs weights for a lot of modelng applications. Like holding wing sheeting in place while the glue dries, It applies a more uniform pressure than a ton of pins spiked into the ribs.

Phil Spillman · Aug 29, 2002 10:10 PM

#28 source
I appreciae all prior entries! My slick trick is to use two sided scotch tape to make all vrieties of sanding sticks. It also works as a way to make "self" stick sand paper for any and all tee bars and other preformed sanding aids. In addition I use paint stirrs and popsicle sticks as a backer for sanding sticks of any special needs or shapes. The paint stirrs with the square edges work the best. Apply the sticky tape to the tool or backer and then press the paper to it or the paper to it whichever works better. When the paper is used up it peals off easily so that you may start over again!