1. The solid surfaces were finished with Minwax Polycrylic and 00 silkspan. Minwax PC has the advantage of being a water based acrylic. Being water based it simply has very little solvents and almost no stink. Being an acrylic makes it a UNIVERSAL undercoat for just about any type of paint. Once the PC dries it takes on a character that is very similar to thin CA. Balsa impregnated with PC becomes ROCK HARD. Using thin silkspan in conjunction with the PC helps to level the surface at application. The Polycrylic is applied over the entire surface and WHILE STILL WET the slightly wetted silkspan attached. Once all the edges have been pulled and the wrinkles are all pulled out, trim the edges of the silkspan. Once trimmed, wet the entire surface of the wet silkspan with a coat of PC. Make sure to do the entire surface evenly and get all of the edges. Let this dry for 24 hours and begin DRY sanding the surface with 180 grit ADHESIVE BACKED 3M YELLOW BODY SHOP PAPER.
Note: This paper can be found at ANY local body shop supply store. I have purchased two different kinds, one is made for air files, it is 3” wide YELLOW and comes on a roll, the other kind is 6” sticky back YELLOW DA discs, both are the same paper. Either one will work. DO NOT SUBSTITUTE!!! The ONLY acceptable substitute is the generic for 3M. It is EXACTLY the same and costs about $10 less. A roll of 3m will cost $30 and will last for many, many airplanes and will be the best all purpose sandpaper you have ever used. If in doubt, buy the 3M, it is still cheap in the long run.
At this point watch for a few different conditions. One, that the entire weave of the silkspan is filled. If it is, you should basically be able to sand all the wrinkles, edges, and surfaces exactly the same. You see, PC makes the balsa and all of the layers of silkspan solid. Each individual layer is no longer unique like when you use dope. The silkspan simply serves as a very thin sponge to accept the liquid plastic. Once the weave is filled, the silkspan is fully impregnated with plastic. I use double layers over edges that are not quite perfect, fill them with PC and sand it all down flat, so it works like a filler. The PC will sand with some work, remember it is HARD STUFF, but hard is good for balsa airplanes, especially for a base coat. Second, you will notice that the paper will cut all of the surfaces about the same. Glue edges will be the same hardness as punk balsa. This is a good opportunity to do the final shaping on joints and flatten everything out and get rid of the ridges that can appear on edges of dissimilar hardness. Lastly, if you do see a silkspan edge appear as you are sanding, YOU DID NOT FILL THE PAPER. Re-coat that area and all other dry areas and sand the next day.
2. For strength, add a second layer of PC and paper to the nose. Re-coat with a third coat after sanding to the nose. The nose will be shiny and ROCK HARD! Also, re-coat at the fillet areas (we have no fillets at this point). Make sure that area gets shiny also. This allows you to sand the final fillets without gouging the wood, as the shiny areas will be extra hard. Please don’t go crazy with the PC at this point. One coat of PC is equal to about 4 coats of unthinned dope. Too much all over will add up, so why do it?
3. For very small dings I use plain old spackling. As to whether is will shrink, I have no problems, but since the spackling is saturated with PC I really doubt there will be problem. For fillets I use Epoxolite or 5 minute epoxy depending on the size of the fillet. Blend sand the Epoxolite in the PC, you will notice the PC hardness will give you more freedom to be aggressive without cutting into the wood, but still watch carefully. Overcoat the finished fillets with a coat of PC for adhesion.
4. For open bays use medium Sig silkspan and filled with three coats of nitrate dope with zinc stearate. This is the slowest step in the entire process. On my designs I have no open bays. I have tried PC on open bays, and I have yet to make it work. Bill does, and he is very happy with it. I use nitrate, because that is what I am comfortable using.
5. Shoot the entire plane in gray primer. I use cheap lacquer primer from English Auto supply. Every auto supply has the same lacquer based primer. I absolutely recommend using urethane reducer in the primer (I use Omni medium urethane reducer). I thinned the first coat 2 to 1. The second 3 to 1. The first coat was sanded (DRY ALWAYS DRY NEVER EVER WET SAND) with 180 YELLOW paper and the second cut with 180 and finished with 320 YELLOW.
6. For color use 1 to 1 non-catalyzed polyester basecoat. Common types are Dupont Chromabase or PPG Omni for a good, not too expensive solution. Basecoat dries in about 5 to 10 minutes and can be taped on top in that time.
7. I use 3M blue tape for sharp edges. I use regualar masking tape for all others. I also use a paper/mask dispenser that I bought at Sherwin Williams. I recommend that every human being on the planet purchase a tape/paper dispenser. There simply is no substitute.
The clear I am using now is the Matrix 2 to 1 urethane clear. All of the companies offer a “premium” 2 to 1 clear. I have no love of Matrix, Bill just gave me the clear, as it was a sample from a sales rep. I would normally use Valspar brand. You could substitute PPG or Dupont. I have also used 4 to 1 clears, including Chromaclear and Valpsar and they behave exactly the same as each other. I like the 2 to 1 better. I thin 100% with Omni medium reducer. 3 oz of clear, 3 oz of reducer for a total of 6 oz in the gun will do a Nobler sized plane. Result is a 1.5 oz clear coat (see note). First coat is shot semi-gloss, the second is shot a little wetter. Allow 10-15 minutes in between to let the reducer gas off. Don’t try to fix all the orange peel until you give the material 10 minutes to flow, you might be surprised how much it will. The 2 to 1 clear is just so much easier to shoot and seems to not want to run if "stacked" like the 4 to 1 clears. Not to mention the shine is at least triple.
Note: If a clear is 2 to 1 it is typically 60% solids (thank the EPA). I use a gravity fed "HVLP compliant" Harbor Freight gun, which averages about 75% of transfer. That being the case, 75% of 60% of the weight of the clear (actual clear, not reducer) will end up on the airplane. Using rough numbers, 50% of the clear in the gun will end up on the plane. Basically, 50% of 3 oz ended up on the P-force, so the clear weighed about 1.5 oz. I would say that is VERY CLOSE to the actual weight. The mistake I have made in the past was not thinning the clear enough to allow the material to flow out nicely (or cover the area). This is not a car, after all, and 50% of what is needed on a car is still quite a lot of clear. Doug and I agree that we have typically used a lot of material to try to get the material to "lay out". I shot 12 oz of clear on my Oriental unthinned. I wish I could go back and do that again. My guess is that clear job weighed 5 oz. People who are used to shooting dope, which is closer to 10% solids will typically shoot WAY TOO much of a high solids clear. Using logic, one coat of 2 to 1 clear is equal to 6 coats of dope at FULL STRENGTH. Which, by my numbers, equates very nicely to about what the dope guys end up shooting on a plane (10 to 15 coats-Windy uses a quart on a plane). The difference being that two coats of thinned urethane clear will lay flat and will only need rubbing if you are a true aficionado. Most guys would be sufficiently impressed with "OEM" car shine.
8. I recently added a "clear only" gun and a Harbor Freight detail gravity feed gun for painting trim colors. The trim gun works very well for the task of shooting masked areas as it naturally shoots very "dry". Perfect for basecoat. The gun I use for primer, basecoat, and clear is the Harbor Freight HVLP "compliant" gravity feed. 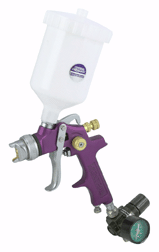
http://www.harborfreight.com/cpi/ctaf/Displayitem.taf?itemnumber=43430
This is the gun that started the gravity feed revolution for stunt community (I am sure there were also the previously enlightened). Bill Wilson was using one at his shop, and after The Moons and I used it, we had to have one. I bought one, the Moons bought theirs, I got one for Al Rabe, he gave his to Frank McMillan, and so on, and so on...
This gun is capable of shooting paint at very low pressures (around 10 to 5 psi depending on the viscosity of the material) since it does not rely on the air pressure to feed the paint to the nozzle. Overspray is truly minimized. The transfer rate is approximately 75%.
I recently acquired a detail version of the same gun. It was on sale for $34.95 with the regulator and I just could not turn it down. 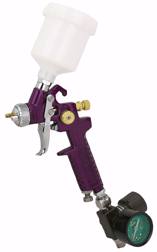
http://www.harborfreight.com/cpi/ctaf/Displayitem.taf?itemnumber=46719
This little guy is great for dry coats of small trim, or simply freehanding a camoflage job on your semi-scale. It is capable if a fan varying from 1/4" to about 3", and could be used as a main gun, but it would be SLOW GOING. I would recomend buying the big gun first.
I would recomend a filter unit for your air supply. They can be had real cheap at Harbor Freight, though. 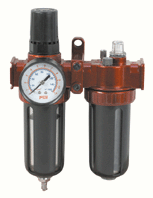
http://www.harborfreight.com/cpi/ctaf/Displayitem.taf?itemnumber=42035
As far as an air compressor, I have a Cambell Hausfeld 3 hp single stage with a 20-gallon tank that I bought WalMart years ago. this compressor is really more than enough for any painting operation I have ever done, and is adequate for more body shop and mechanic's air tools. It is really not necessary to go quite this big for painting alone. Harbor Freight has a good 2 hp pretty cheap. 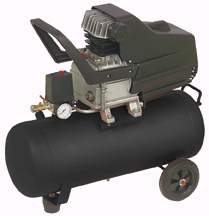
http://www.harborfreight.com/cpi/ctaf/Displayitem.taf?itemnumber=40400
By the way, I in no way guarantee that YOU can do this system the first time. There is learning curve that must be undertaken, just like any other new system. This not Brodak dope by any means.There is definite learning curve to auto paints, and I have a lot of help in Bill Wilson. I could have never figured out any of this stuff on my own.
Lastly, safety.
I just so happened to buy a new organic vapor mask, so I took the opportunity to call the 3M Technical Service Line to get the 411 on the effectiveness of organic vapor “carbon masks” on diisocynates (the bad stuff). Much to my surprise, they are completely affective against these chemicals, even more so than most solvents. The use of “fresh air systems” is not even advocated by OSHA under normal conditions. The only reason fresh air systems were EVER advocated for diisocynates was because there were no “warning signs” for these chemicals (like a smell). You can read the whole article here.
http://www.3m.com/occsafety/pdfs/respirator1.pdf
This is the nuts and bolts of the article.
Misconception No. 1: Air-purifying respirators should not be used because diisocyanates have poor warning properties.
Although OSHA specifically permits change schedules in lieu of sensory warning properties, some health and safety professionals argue this is not a safe practice. They believe diisocyanates could enter a facepiece through a spent cartridge or defect (e.g., a torn exhalation valve), and the user would be unaware, risking prolonged exposure.
Misconception No. 2: Air-purifying respirators cannot remove diisocyanates.
In fact, it has been known for many years that diisocyanates are adsorbed by activated carbon and retained extremely well. Cartridge breakthrough equations predict very long service lives for diisocyanates under plausible use conditions.
Misconception No. 3: Air-purifying respirators are not approved for gases and vapors with poor warning properties.
NIOSH supports OSHA’s requirement for change schedules and recommends against relying on warning properties. In addition, NIOSH recently directed respirator manufacturers to change the cautionary language on cartridge and canister
approval labels and user instructions to be consistent with 1910.134. Specifically, the statement “do not wear for protection against organic vapors with poor warning properties or those which generate high heats of reaction with sorbent” must be changed to “follow established cartridge and canister change schedules or observe ESLI to ensure that cartridges and canisters are replaced before breakthrough occurs.”
The City Smasher
